نصب مجدد ویندوز – پشتیبانی مایکروسافت ، ویندوز 11/10 نحوه ایجاد و استفاده از رسانه های نصب برای نصب مجدد ویندوز 11/10 از طریق USB Drive | پشتیبانی رسمی | ایسوس ایالات متحده آمریکا
ویندوز 11/10 نحوه ایجاد و استفاده از رسانه های نصب برای نصب مجدد ویندوز 11/10 از طریق USB Drive
. قبل از نصب مجدد ویندوز 11 ، سعی کنید فضای دیسک را آزاد کنید تا ببینید که آیا این کمک می کند. برای اطلاعات بیشتر ، به فضای درایو رایگان در ویندوز مراجعه کنید.
ویندوز را دوباره نصب کنید
اگر با ویندوز 11 در رایانه شخصی خود مشکل دارید یا می خواهید یک نسخه تازه از ویندوز 11 بدون درهم و برهمی فایل های قدیمی یا برنامه ها داشته باشید ، می توانید ویندوز 11 را دوباره نصب کنید تا مشکلات خود را برطرف کرده و رایانه خود را به حالت پاک کننده برگردانید.
فضای دیسک خود را بررسی کنید
اگر رایانه شما مطابق آنچه انتظار می رود عمل نمی کند یا با ویندوز 11 مشکلی دارید ، ممکن است به دلیل فضای کم دیسک باشد. قبل از نصب مجدد ویندوز 11 ، سعی کنید فضای دیسک را آزاد کنید تا ببینید که آیا این کمک می کند. برای اطلاعات بیشتر ، به فضای درایو رایگان در ویندوز مراجعه کنید.
قبل از اینکه شروع کنی
حتماً از داده های خود نسخه پشتیبان تهیه کنید
اگر داده ها و پرونده های شخصی دارید که می خواهید ذخیره کنید ، قبل از شروع نصب مجدد ویندوز 11 ، آنها را به یک هارد اکسترنال ، درایو USB Thumb ، کارت SD یا مکان ابری (مانند OneDrive) پشتیبان بگیرید.
ویندوز 11 پس از نصب مجدد باید فعال شود. معمولاً بعد از آنلاین شدن این اتفاق به طور خودکار اتفاق می افتد. برای اطلاعات بیشتر ، به “فعال کردن پس از نصب مجدد ویندوز” در فعال کردن ویندوز مراجعه کنید.
قبل از نصب ویندوز باید حساب مایکروسافت خود را به مجوز دیجیتالی خود پیوند دهید
در ویندوز 11 ، شما باید قبل از فعال کردن ویندوز ، حساب Microsoft خود را به مجوز دیجیتال ویندوز 11 در رایانه شخصی خود پیوند دهید. .
اگر تغییر سخت افزاری قابل توجهی در رایانه شخصی خود ایجاد کرده اید ، باید ویندوز 11 را دوباره فعال کنید
اگر ویندوز 11 را دوباره نصب کنید پس از ایجاد تغییر سخت افزاری قابل توجه در رایانه شخصی (مانند تعویض مادربرد) ، دیگر ممکن است فعال نشود. برای فعال کردن ویندوز می توانید از عیب یابی فعال سازی استفاده کنید. برای اطلاعات بیشتر ، به استفاده از عیب یابی فعال سازی مراجعه کنید.
هنگامی که ویندوز 11 را دوباره نصب می کنید ، باید نسخه ویندوز را که با مجوز دیجیتالی شما مطابقت دارد انتخاب کنید. به عنوان مثال ، اگر ویندوز 11 را در خانه اجرا می کنید ، مجدداً ویندوز 11 را نصب کنید.
برای دیدن کدام نسخه از ویندوز که در حال اجرا هستید ، بروید شروع > تنظیمات > سیستم > در باره . نسخه شما در زیر ذکر شده است مشخصات ویندوز.
نمودار زیر اطلاعاتی در مورد گزینه های مختلفی که می توانید برای هر نوع مجدداً انتخاب کنید ، از جمله آنچه در برنامه ها ، پرونده ها ، داده های شخصی و میزان فضای دیسک برای نصب مجدد لازم است ، ارائه می دهد. از این نمودار استفاده کنید تا به شما کمک کند تصمیم بگیرید که برای نصب مجدد ویندوز 11 از کدام گزینه استفاده کنید.
- نصب مجدد ویندوز 11 با استفاده از رسانه های نصب در حالی که می خواهید “هیچ چیز را نگه دارید” (نصب تمیز) به طور خودکار ذخیره سازی محفوظ را فعال می کند اگر پارتیشن شما را مجدداً نصب کنید تا 20 گیگابایت یا بزرگتر باشد. مجموعه های ذخیره سازی محفوظ ، فضای دیسک را کنار می گذارد که توسط به روزرسانی ها ، برنامه ها ، پرونده های موقت و ذخیره های سیستم مورد استفاده قرار می گیرد ، بنابراین عملکرد روزانه رایانه شخصی خود را با اطمینان از اینکه عملکردهای مهم سیستم عامل همیشه به فضای دیسک دسترسی دارند ، بهبود می بخشد.
- برای دستگاه های دارای ذخیره سازی رزرو شده ، تنظیم مجدد یا نصب مجدد ابتدا از فضای ذخیره سازی رزرو شده قبل از استفاده از فضای دیگر دیسک استفاده می کند. برای اطلاعات بیشتر ، ببینید که چگونه ذخیره سازی رزرو شده در ویندوز کار می کند.
نصب مجدد نوع
گزینه هایی را که می توانید انتخاب کنید دوباره نصب کنید
چه اتفاقی برای برنامه های شما می افتد
چه اتفاقی برای شخصی شما می افتد داده های ذخیره شده در زیر \ کاربران
چه اتفاقی برای داده های ذخیره شده در پوشه ها یا درایوهای دیگر می افتد
فضای دیسک مورد نیاز است
برنامه هایی که با رایانه شما همراه نیستند حذف شده اند.
برنامه هایی که با رایانه شما همراه نیستند حذف شده اند.
همه برنامه ها و تنظیمات حفظ می شوند.
داده های شخصی را حفظ کنید
همه برنامه ها حذف می شوند.
.
(این گزینه دوباره نصب همه پارتیشن های دیسک را حذف و بازآفرینی می کند.
بازنشانی ویندوز 11
. ویندوز همه چیز را به طور خودکار اداره می کند ، و شما نیازی به استفاده از یک دستگاه ذخیره سازی خارجی ندارید. .
می توانید رایانه شخصی خود را از تنظیمات یا محیط بازیابی ویندوز (WINRE) تنظیم کنید ، که از طریق صفحه ورود به سیستم قابل دسترسی است. برای مراحل تنظیم مجدد ویندوز 11 ، به تنظیم مجدد یا نصب مجدد ویندوز مراجعه کنید.
اگر رایانه شخصی شما فضای کافی برای تنظیم مجدد ویندوز 11 ندارد ، یک اعلان دریافت خواهید کرد. در این سناریو ، فضای اضافی را آزاد کنید یا از مراحل موجود در بخش بعدی برای نصب مجدد ویندوز 11 استفاده کنید.
ویندوز 11 را با استفاده از رسانه نصب دوباره نصب کنید
این گزینه از ابزاری برای ایجاد رسانه نصب استفاده می کند که می توانید از آن برای پاک کردن کامل دیسک و نصب یک کپی تازه از ویندوز 11 استفاده کنید. این گزینه شما را ملزم به استفاده از یک دستگاه ذخیره سازی خارجی مانند درایو USB می کند و به شما گزینه ای می دهد تا در هنگام نصب چه چیزی را حفظ کنید.
قبل از شروع ، اطمینان حاصل کنید که موارد زیر را دارید:
- یک اتصال اینترنتی
- یک دستگاه ذخیره سازی خارجی مانند درایو USB ، کارت SD یا هارد دیسک خارجی با حداقل 8 گیگابایت فضای موجود.
.
-
اطمینان حاصل کنید که از هر پرونده موجود در دستگاه خود که مایل به ذخیره روی یک دستگاه ذخیره سازی خارجی مانند درایو USB ، کارت SD یا هارد دیسک خارجی هستید ، تهیه کرده اید یا پرونده های خود را در OneDrive بارگذاری کرده اید.
توجه داشته باشید: اگر از یک دستگاه ذخیره سازی خارجی برای تهیه نسخه پشتیبان از پرونده ها استفاده می کنید ، مطمئن شوید که این یکی متفاوت از دستگاهی است که برای بارگیری رسانه نصب ویندوز 10 استفاده خواهید کرد.
- در یک رایانه کاری ، به وب سایت بارگیری نرم افزار Microsoft بروید و انتخاب کنید اکنون ابزار بارگیری.
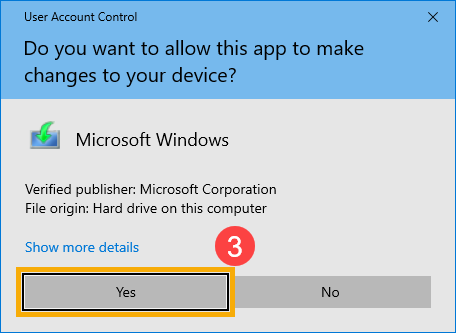
- پس از اتمام بارگیری ، ابزار را از دسک تاپ خود باز کنید و سپس انتخاب کنید آره وقتی از شما سؤال می شود که آیا می خواهید به برنامه اجازه دهید در دستگاه شما تغییراتی ایجاد کند.
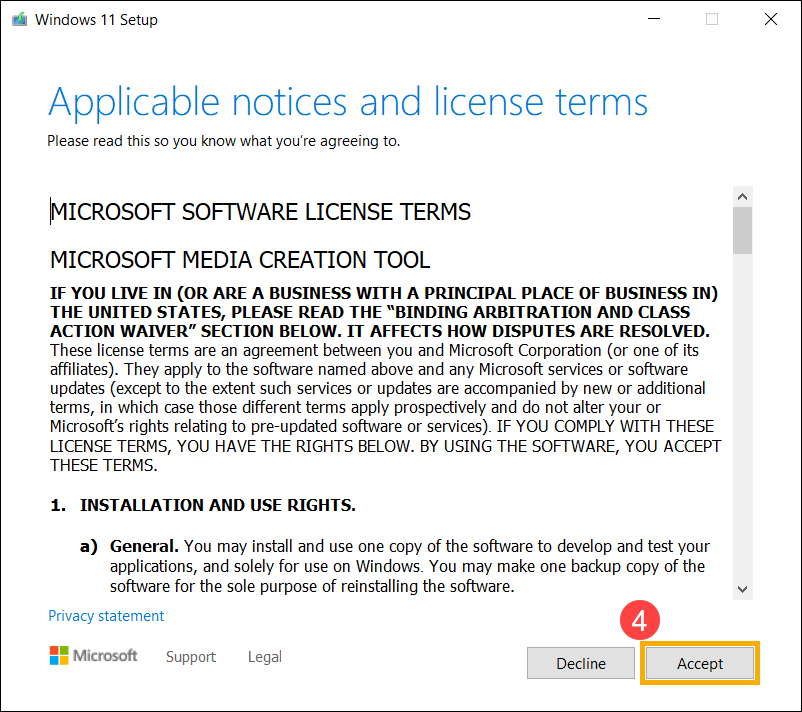
- هنگامی که راهنمای تنظیم ویندوز 11 ظاهر می شود ، شرایط و توافق نامه ها را بپذیرید.
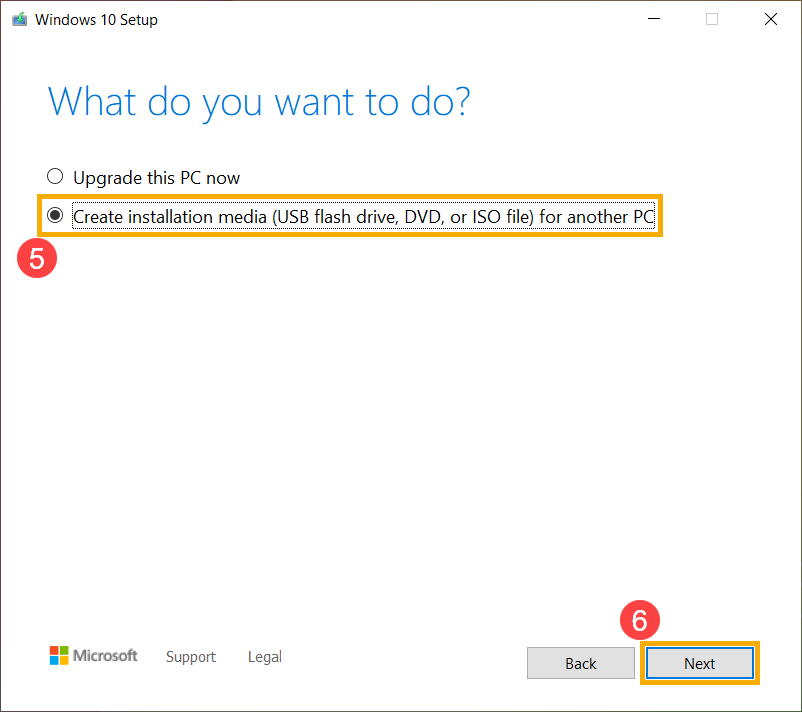
- انتخاب کنید ایجاد رسانه نصب (USB Flash Drive ، DVD یا File ISO) برای رایانه دیگر, و سپس انتخاب کنید .
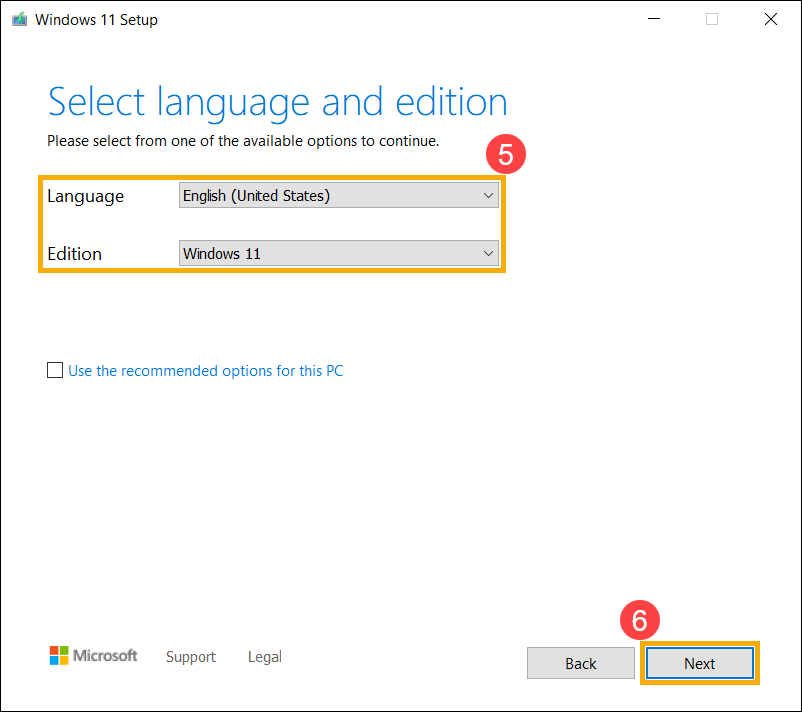
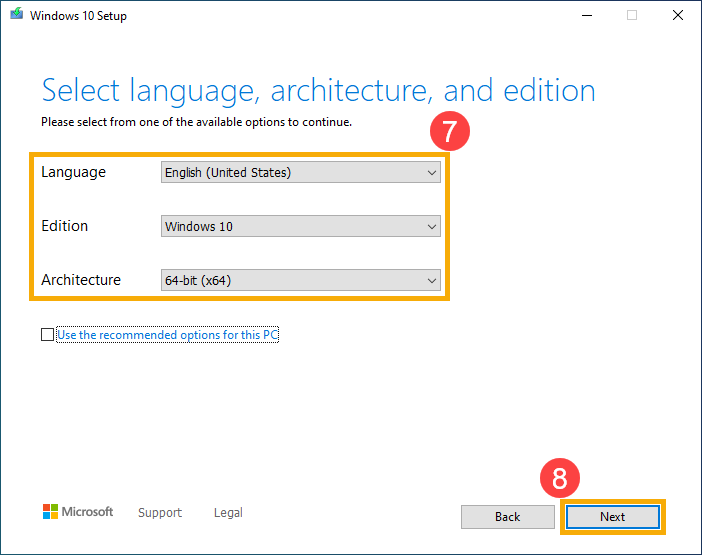
- یک زبان ، نسخه و معماری (64 بیتی یا 32 بیتی) را انتخاب کنید و سپس انتخاب کنید بعد.
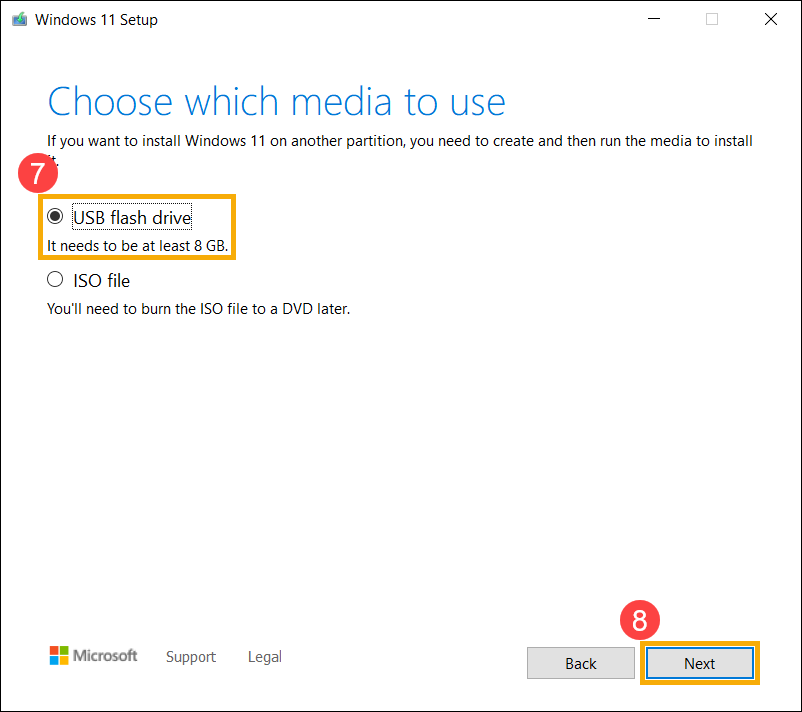
- فلش درایو USB, و سپس انتخاب کنید بعد.
- مراحل ایجاد رسانه نصب را دنبال کنید و سپس انتخاب کنید پایان.
رسانه نصب را که ایجاد کرده اید به رایانه شخصی خود وصل کنید و ویندوز 11 را دوباره نصب کنید.
- باز کن جستجوگر فایل و درایو را با رسانه نصب انتخاب کنید.
- از فهرست اصلی درایو ، راه اندازی دوبار کلیک کنید.exe ، و سپس انتخاب کنید آره وقتی از شما سؤال می شود که آیا می خواهید به برنامه اجازه دهید در دستگاه شما تغییراتی ایجاد کند.
- تغییر دادن برای تعیین اینکه چه چیزی را حفظ کنید: یکی از گزینه های زیر را انتخاب کنید و سپس انتخاب کنید بعد:
- پرونده ها و برنامه های شخصی را نگه دارید – این داده ها ، برنامه ها و تنظیمات شخصی شما را حفظ می کند.
- فقط فایل های شخصی را نگه دارید – این داده ها و تنظیمات شخصی شما را حفظ می کند ، اما تمام برنامه های شما حذف می شوند.
- هیچ چیز – این همه داده ها ، تنظیمات و برنامه ها را حذف می کند.
هشدار: شما نمی توانید نصب مجدد ویندوز 10 را خنثی کنید. در صورت انتخاب ، حتماً از پرونده های خود نسخه پشتیبان تهیه کنید هیچ چیز گزینه.
رایانه شخصی شما در طول نصب مجدد چندین بار مجدداً راه اندازی می شود.
نصب ویندوز 11 را با استفاده از رسانه نصب تمیز کنید
- نصب تمیز یک گزینه پیشرفته برای کمک به شما در شروع تازه در دستگاه است. توصیه می کنیم مراحل زیر را فقط در صورت اطمینان در انجام این تغییرات دنبال کنید. برای کمک بیشتر ، با پشتیبانی تماس بگیرید.
- با این کار تمام پرونده ها ، برنامه ها و درایورهای شخصی شما که نصب کرده اید ، برنامه ها و سفارشی سازی ها را از تولید کننده رایانه شخصی خود حذف می کند و تغییراتی را در تنظیمات ایجاد می کند.
این گزینه از ابزاری برای ایجاد رسانه نصب استفاده می کند که می توانید از آن برای پاک کردن کامل دیسک و نصب یک کپی تازه از ویندوز 11 استفاده کنید. این گزینه شما را ملزم به استفاده از یک دستگاه ذخیره سازی خارجی مانند درایو USB می کند ، و ممکن است چند مرحله اضافی را طی کند ، اگرچه همه چیز را برای پاک ترین نصب حذف می کند. . تمام پرونده های شخصی موجود در دستگاه شما و پارتیشن موجود در هارد شما که در حال حاضر برای درایو بازیابی شما استفاده می شود ، حذف می شود.
قبل از شروع ، اطمینان حاصل کنید که موارد زیر را دارید:
- یک اتصال اینترنتی
- یک دستگاه ذخیره سازی خارجی مانند درایو USB ، کارت SD یا هارد دیسک خارجی با حداقل 8 گیگابایت فضای موجود
رسانه نصب را ایجاد کنید
ابتدا رسانه نصب را ایجاد کنید که برای انجام یک نصب تمیز ویندوز 11 استفاده می کنید.
-
اطمینان حاصل کنید که از هر پرونده موجود در دستگاه خود که مایل به ذخیره روی یک دستگاه ذخیره سازی خارجی مانند درایو USB ، کارت SD یا هارد دیسک خارجی هستید ، تهیه کرده اید یا پرونده های خود را در OneDrive بارگذاری کرده اید.
توجه داشته باشید: اگر از یک دستگاه ذخیره سازی خارجی برای تهیه نسخه پشتیبان از پرونده ها استفاده می کنید ، مطمئن شوید که این یکی متفاوت از دستگاهی است که برای بارگیری رسانه نصب ویندوز 11 استفاده خواهید کرد.
- در یک رایانه کاری ، به وب سایت بارگیری نرم افزار Microsoft بروید و انتخاب کنید اکنون ابزار بارگیری.
- پس از اتمام بارگیری ، ابزار را از دسک تاپ خود باز کنید و سپس انتخاب کنید آره .
- هنگامی که راهنمای تنظیم ویندوز 11 ظاهر می شود ، شرایط و توافق نامه ها را بپذیرید.
- ایجاد رسانه نصب (USB Flash Drive ، DVD یا File ISO) از رایانه دیگر, و سپس انتخاب کنید بعد.
- .
- پایان.
.
-
انتخاب کنید >تنظیمات >سیستم >بهبود .
از یک دستگاه استفاده کنید .
.
فضای دیسک خود را بررسی کنید
اگر رایانه شما مطابق آنچه انتظار می رود عمل نمی کند یا با ویندوز 10 مشکلی دارید ، ممکن است به دلیل فضای کم دیسک باشد. قبل از نصب مجدد ویندوز 10 ، سعی کنید فضای دیسک را آزاد کنید تا ببینید که آیا این کمک می کند. برای اطلاعات بیشتر ، به فضای درایو رایگان در ویندوز مراجعه کنید.
حتماً از داده های خود نسخه پشتیبان تهیه کنید
.
ویندوز 10 پس از نصب مجدد باید فعال شود. معمولاً بعد از آنلاین شدن این اتفاق به طور خودکار اتفاق می افتد. برای اطلاعات بیشتر ، به “فعال کردن پس از نصب مجدد ویندوز 10” در فعال کردن ویندوز مراجعه کنید.
توجه داشته باشید: اگر ویندوز 10 پس از به روزرسانی از ویندوز 7 یا ویندوز 8 روی دستگاه شما فعال شد.. برای اطلاعات بیشتر ، به “فعال کردن پس از نصب مجدد ویندوز 10” در فعال کردن ویندوز مراجعه کنید.
در ویندوز 10 (نسخه 1607 یا بالاتر) ، باید قبل از فعال کردن ویندوز ، حساب Microsoft خود را به مجوز دیجیتال ویندوز 10 در رایانه شخصی خود پیوند دهید. برای اطلاعات بیشتر ، پس از تغییر سخت افزار ، به “مجوز ویندوز 10 خود را با حساب مایکروسافت خود” در ویندوز فعال کنید.
اگر تغییر سخت افزاری قابل توجهی در رایانه شخصی خود ایجاد کرده اید ، باید ویندوز 10 را دوباره فعال کنید
اگر ویندوز 10 را دوباره نصب کنید پس از ایجاد تغییر سخت افزاری قابل توجه در رایانه شخصی (مانند تعویض مادربرد) ، دیگر ممکن است فعال نشود. . برای اطلاعات بیشتر ، به استفاده از عیب یابی فعال سازی مراجعه کنید.
توجه داشته باشید: اگر قبل از تغییر سخت افزار ویندوز 10 را اجرا نکردید ، یا اگر عیب یابی نتواند ویندوز را دوباره فعال کند ، با پشتیبانی تماس بگیرید.
شما باید نسخه ویندوز را که با مجوز شما مطابقت دارد ، دوباره نصب کنید
هنگامی که ویندوز 10 را دوباره نصب می کنید ، باید نسخه ویندوز را که با مجوز دیجیتالی شما مطابقت دارد انتخاب کنید. به عنوان مثال ، اگر ویندوز 10 را در خانه اجرا می کنید ، مجدداً ویندوز 10 را نصب کنید.
انواع نصب مجدد برای ویندوز 10
نمودار زیر اطلاعاتی در مورد گزینه های مختلفی که می توانید برای هر نوع مجدداً انتخاب کنید ، از جمله آنچه در برنامه ها ، پرونده ها ، داده های شخصی و میزان فضای دیسک برای نصب مجدد لازم است ، ارائه می دهد. از این نمودار استفاده کنید تا به شما کمک کند تصمیم بگیرید که برای نصب مجدد ویندوز 10 از کدام گزینه استفاده کنید.
- با شروع بروزرسانی ویندوز 10 مه 2019 (نسخه 1903) ، نصب مجدد ویندوز 10 با استفاده از رسانه های نصب در حالی که تصمیم می گیرید “هیچ چیز نگه دارید” (نصب تمیز) به طور خودکار ذخیره سازی رزرو شده را فعال می کند اگر پارتیشن ویندوز را دوباره نصب کنید 20 گیگابایت یا بزرگتر. مجموعه های ذخیره سازی محفوظ ، فضای دیسک را کنار می گذارد که توسط به روزرسانی ها ، برنامه ها ، پرونده های موقت و ذخیره های سیستم مورد استفاده قرار می گیرد ، بنابراین عملکرد روزانه رایانه شخصی خود را با اطمینان از اینکه عملکردهای مهم سیستم عامل همیشه به فضای دیسک دسترسی دارند ، بهبود می بخشد.
- برای دستگاه های دارای ذخیره سازی رزرو شده ، تنظیم مجدد یا نصب مجدد ابتدا از فضای ذخیره سازی رزرو شده قبل از استفاده از فضای دیگر دیسک استفاده می کند. .
نصب مجدد نوع
گزینه هایی را که می توانید انتخاب کنید دوباره نصب کنید
چه اتفاقی برای شخصی شما می افتد داده های ذخیره شده در زیر \ کاربران
چه اتفاقی برای داده های ذخیره شده در پوشه ها یا درایوهای دیگر می افتد
فضای دیسک مورد نیاز است
برنامه هایی که با رایانه شما همراه نیستند حذف شده اند.
[ویندوز 11/10] نحوه ایجاد و استفاده از رسانه های نصب برای نصب مجدد ویندوز 11/10 از طریق USB Drive
محصول E420 ، E520 ، MINIPC PB50 ، MINIPC PB60V ، MINIPC PB61V ، MINIPC PB62 ، MINIPC PN52 ، MINIPC PN80 ، PA90 ، PB40 ، PB40-B ، PB50 ، PB50-B ، PB60 ، PB60 ، PB60 ، PB60G ، PB60G ، PB60G ، PB60G ، PB60-B60-B60-B60-B60-B60-B60-B60-B60-B60-B60-B60-B60-B60-B60-B60-B60-B60-B60-B60-B60-B60-B60-B60-B ، PB60V ، PB61S ، PB61V ، PB61V-B ، PB61V-H ، PB62 ، PB62-B ، PB63 ، PB63-B ، PL63 ، PL63-A ، PL63-B ، PL64 ، PL64-B ، PL64-D1 ، PL64-D1 ، PL64-D1 -B ، PN30 ، PN40 ، PN40Q ، PN41 ، PN41-A ، PN41-B ، PN41-S1 ، PN41-S1-B ، PN41-S1-M ، PN41-S1-MI ، PN42 ، PN42-B ، PN42-S ، PN42-S-B ، PN50 ، PN50-B ، PN50-E1 ، PN50-E1-B ، PN50-F ، PN50F2 ، PN50-S1 ، PN51 ، PN51-B ، PN51-E1 ، PN51E1E1-B ، PN51-S1 ، PN51-PN51 -S1-B ، PN52 ، PN52-B ، PN53 ، PN53-B ، PN53-S1 ، PN53-S1-B ، PN60 ، PN60-B ، PN60-R ، PN61 ، PN61-B ، PN61S ، PN61T ، PN62 ، PN62 -B ، PN62S ، PN63 ، PN63-B ، PN63-S1 ، PN63-S1-B ، PN64 ، PN64-B ، PN64-E1 ، PN64-E1-B ، PN65 ، PN65-B ، PN80 ، PN865 ، UN42 ، UN45 , UN45H, UN62, UN62V, UN65, UN65H, UN65U, UN66, UN66S, UN68U, VC60, VC60DGT, VC60V, VC62B, VC65, VC65-C, VC65-C1, VC65R, VC66, VC66-C, VC66-C2, VC66D باVC66R ، VC68R ، VC68V ، VM40B ، VM42 ، VM45 ، VM60 ، VM62 ، VM62B ، VM62N ، VM65 ، VM65-K ، VM65N ، VM65N-K
- [اکنون بارگیری کن] ایجاد رسانه نصب ویندوز 11 رشته.

- به پوشه بارگیری شده از ابزار بروید ، سپس دوبار کلیک کنید [MediaCreationTool] ② پرونده برای شروع نصب.

- کنترل حساب کاربری پنجره نمایش داده شده ، لطفا انتخاب کنید ③ .

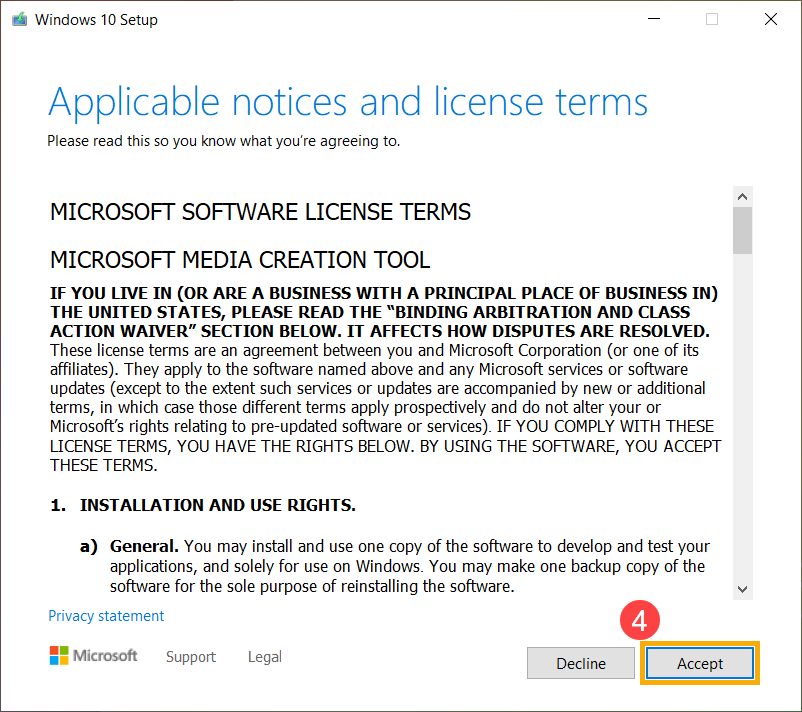
- لطفاً شرایط مجوز نرم افزار مایکروسافت و اطلاعیه های قابل اجرا را بخوانید ، سپس انتخاب کنید [تایید کنید] .

- زبان و نسخه ای را که می خواهید برای رسانه نصب ویندوز 11 ایجاد کنید انتخاب کنید ، سپس انتخاب کنید [بعد] ⑥ .
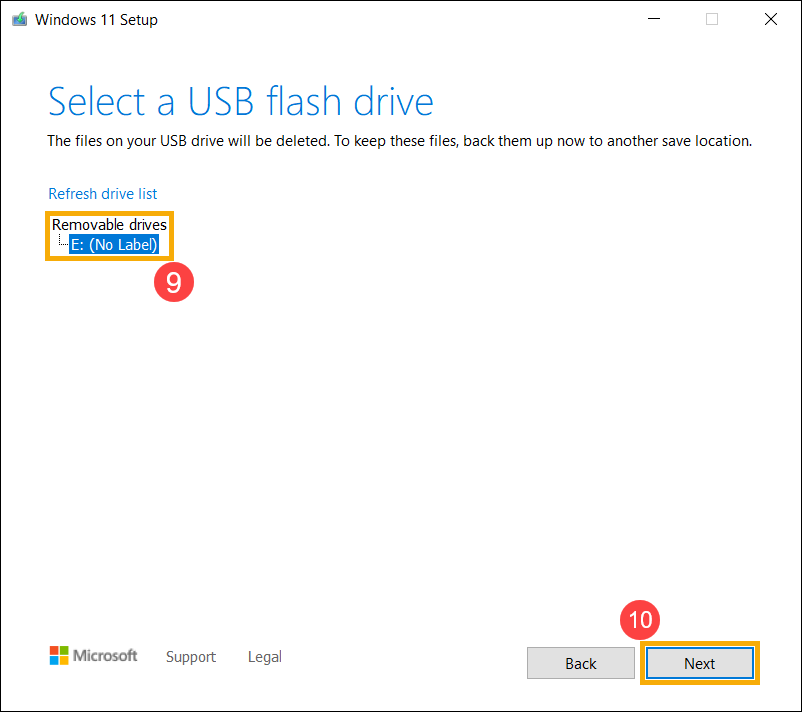
: لطفاً زبان و نسخه صحیح را برای واحد هدف خود انتخاب کنید برای جلوگیری از هرگونه خطایی در فعال سازی ویندوز 11 پس از آن (اگر رایانه شما با مجوز دیجیتال باشد ، ویندوز 11 پس از اتمام نصب آنلاین به طور خودکار فعال می شود). - درایو فلش USB را که می خواهید به عنوان یک رسانه نصب ویندوز 11 به رایانه خود ایجاد کنید ، وصل کنید ، انتخاب کنید [فلش درایو USB] ⑦ و سپس انتخاب کنید [بعد] ⑧ .
توجه داشته باشید: تمام پرونده های موجود در درایو فلش USB در طی فرایند حذف می شوند , . - در درایوهای قابل جابجایی ، درایو فلش USB را که می خواهید از آن استفاده کنید ، تأیید کرده و انتخاب کنید ، سپس انتخاب کنید [بعد] ⑩ ، و سیستم شروع به بارگیری و همچنین ایجاد رسانه نصب ویندوز 11 می کند. .
. - رسانه نصب ایجاد شده است ، لطفاً کلیک کنید .


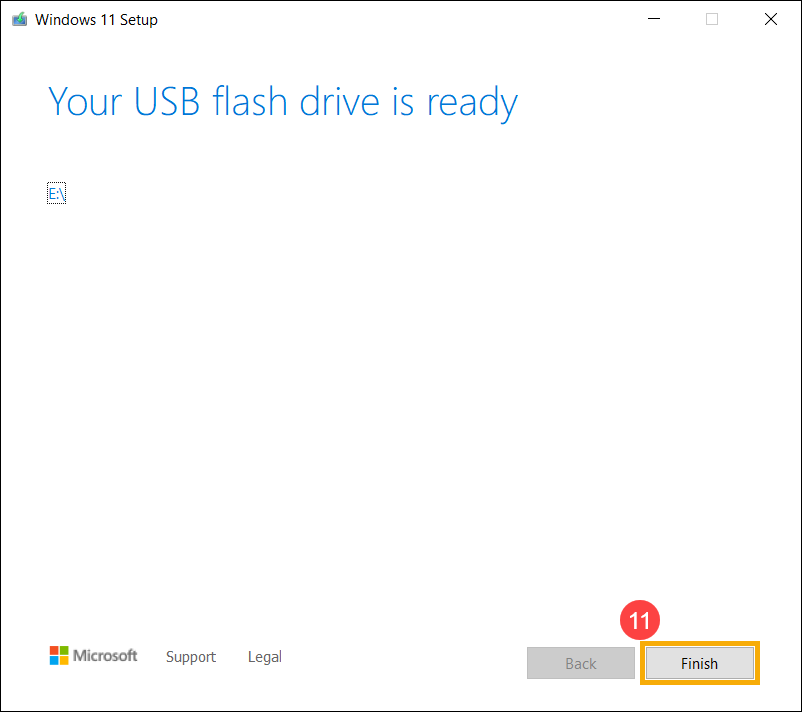
- رسانه نصب (درایو فلش USB) را به رایانه خود وصل کنید.
- روی رایانه برق بگیرید و گزینه Boot را به عنوان USB Flash Drive انتخاب کنید ، در اینجا می توانید در مورد نحوه بوت شدن سیستم از USB Drive اطلاعات بیشتری کسب کنید.
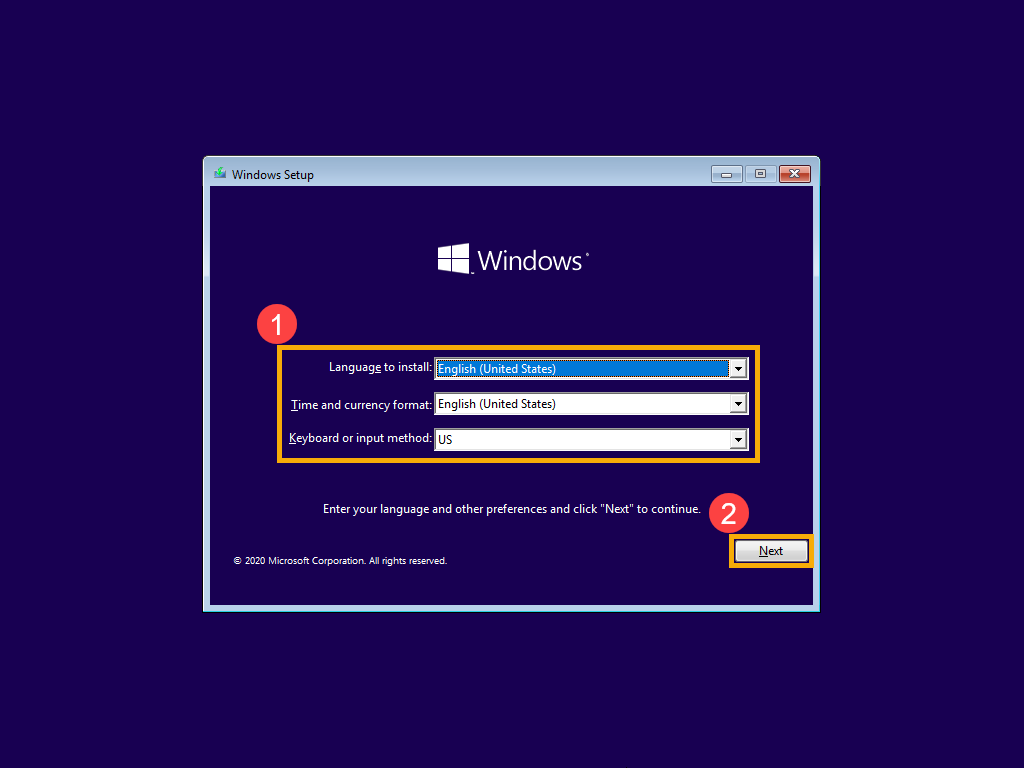
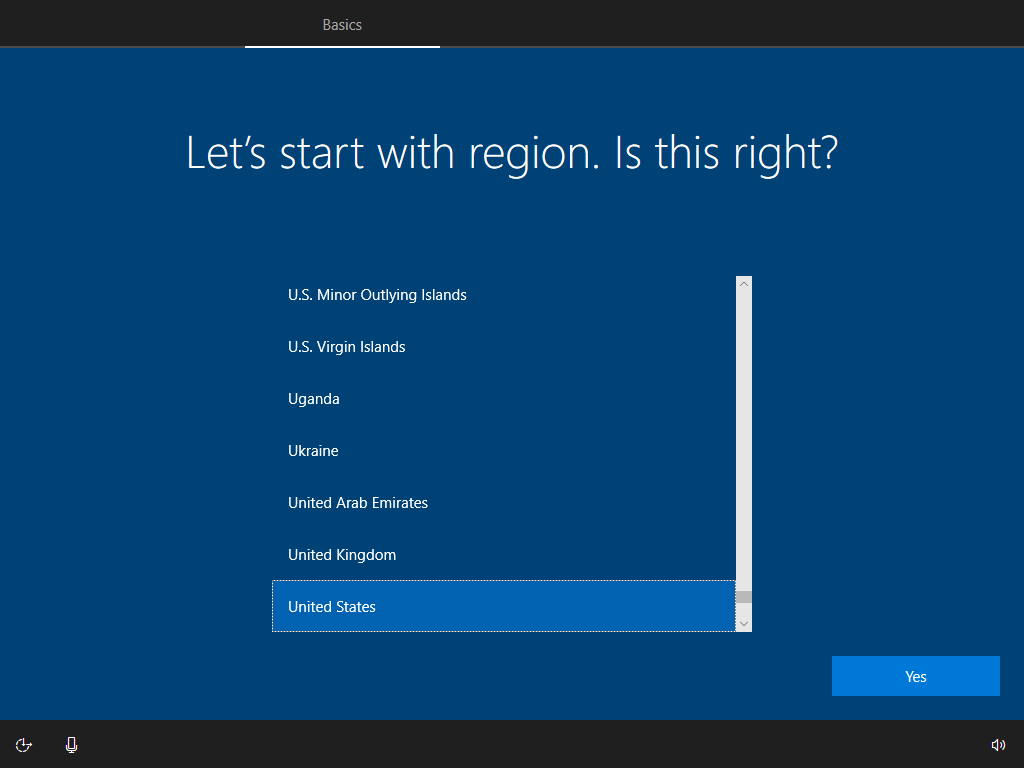
- رایانه راه اندازی ویندوز را وارد می کند. لطفاً فرمت زبان ، زمان و ارزی و صفحه کلید یا روش ورودی را انتخاب کنید ، سپس کلیک کنید [بعد] .

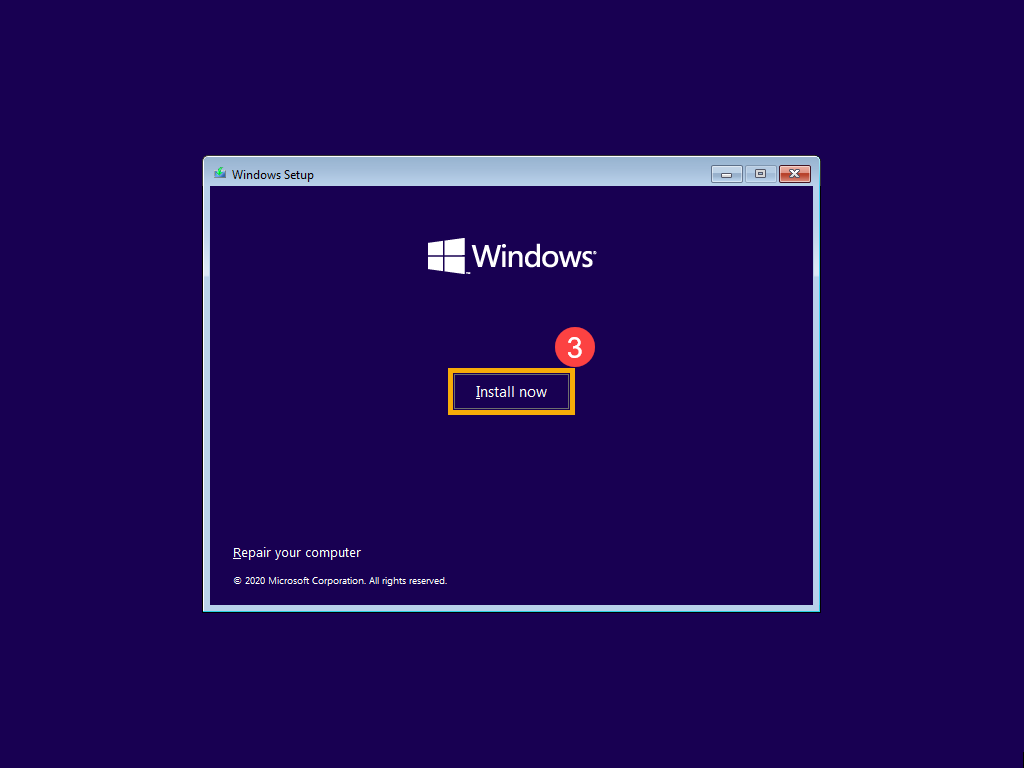
- کلیک [الآن نصب کن] ③ .
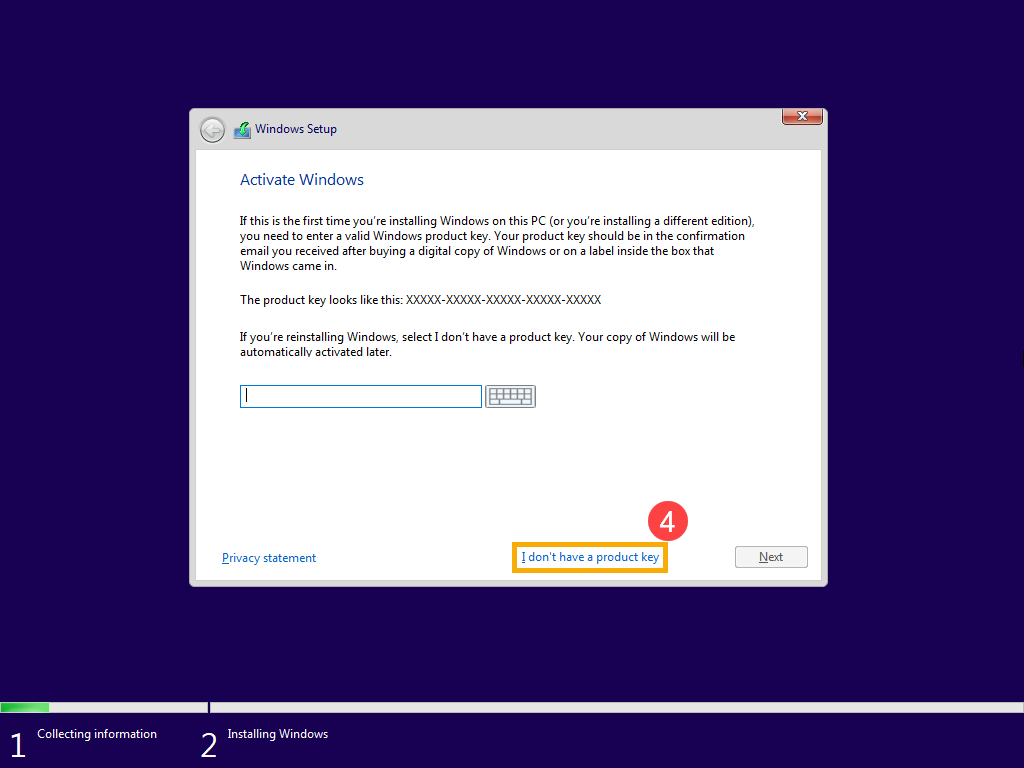
- اگر رایانه شما در سیستم عامل ویندوز ساخته شده است (که یک مجوز دیجیتالی است) ، لطفاً انتخاب کنید [من کلید محصول ندارم] ④ ، ویندوز 11 پس از اتمام نصب به طور خودکار به صورت آنلاین فعال می شود.

- لطفاً نسخه سیستم عامل را که می خواهید نصب کنید انتخاب کنید ، سپس کلیک کنید ⑥ .
توجه داشته باشید: لطفا انتخاب کنید نسخه ای که در ابتدا رایانه شما داشت, .
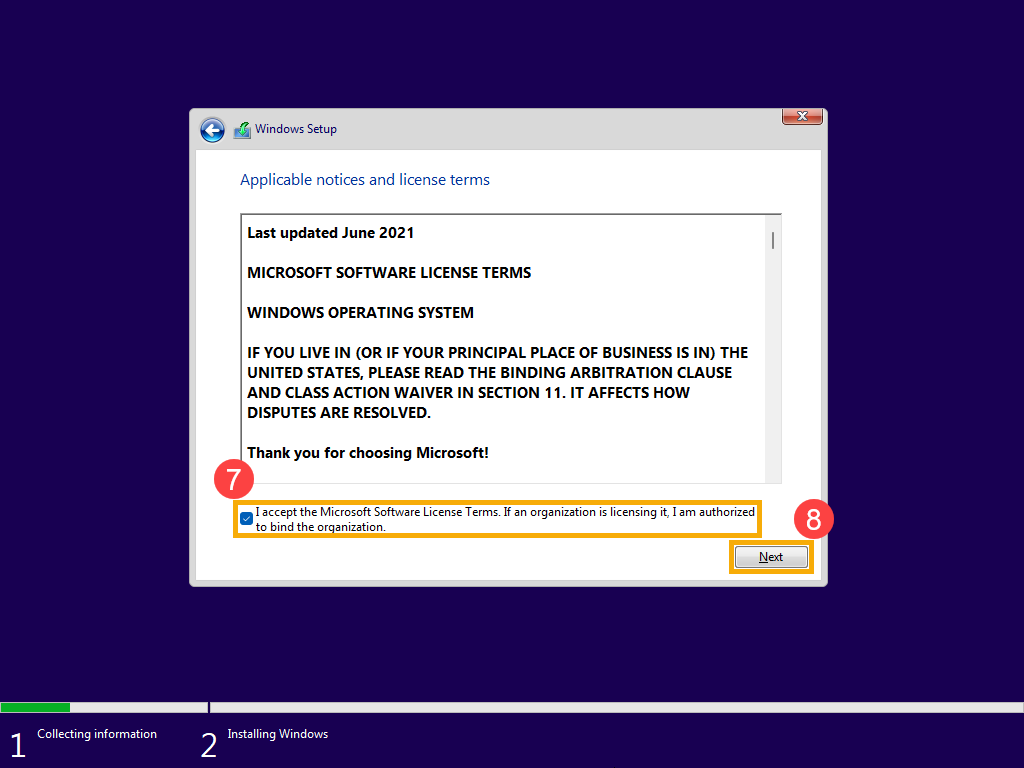
- . کادر را بررسی کنید تا [شرایط قرارداد را می پذیرم] ⑦ ، سپس کلیک کنید ⑧ .
- انتخاب کنید [سفارشی: فقط ویندوز را نصب کنید (پیشرفته)] ⑨ .
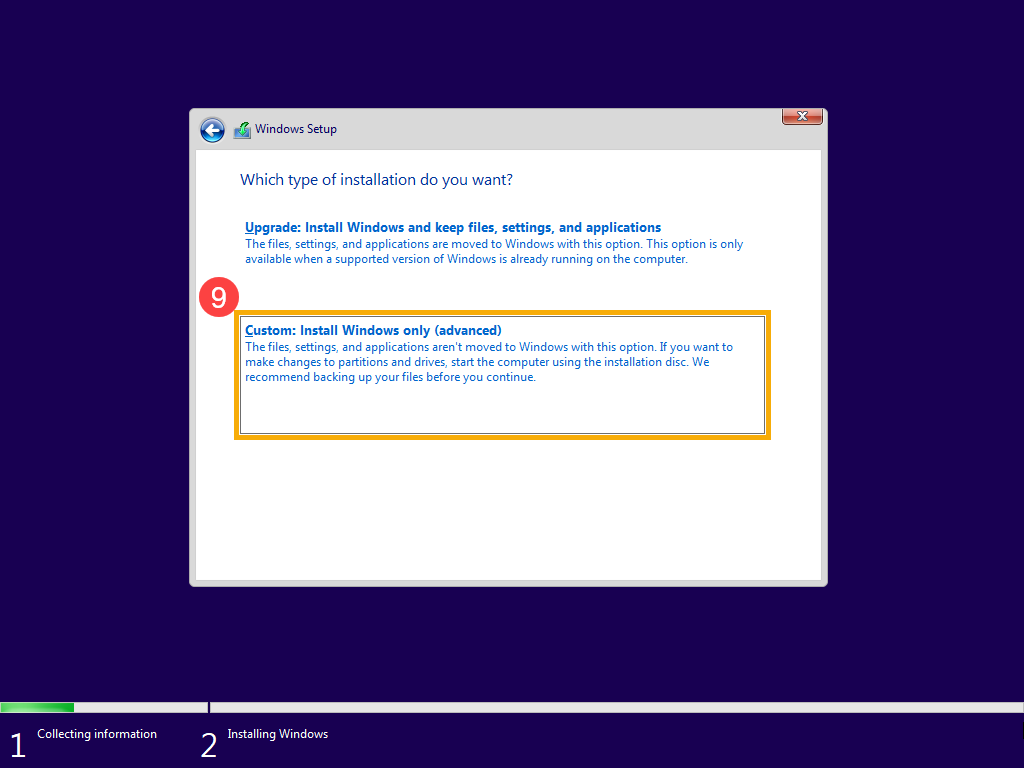
- لیست همه درایوها و پارتیشن ها را در رایانه خود مشاهده خواهید کرد. اگر چندین دیسک نمایش داده شود ، خواهید کرد فقط باید تمام پارتیشن ها را از دیسک جایی که می خواهید ویندوز نصب کنید حذف کنید. (بیشتر دیسک C به عنوان قرار دارد رانندگی 0, .)
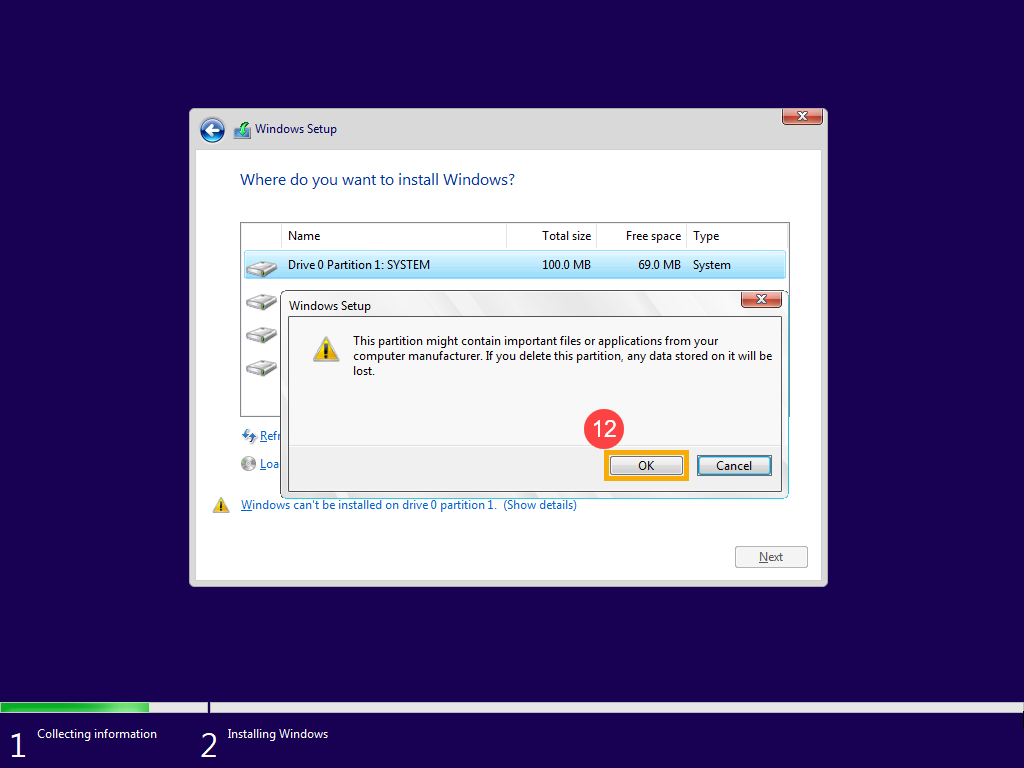
هر پارتیشن درایو 0 را در لیست انتخاب کنید ، سپس انتخاب کنید [حذف] ⑪ . اگر اعلان راه اندازی ویندوز ظاهر شد ، لطفاً انتخاب کنید [خوب] ⑫ .
: اگر حذف را در سایر دیسک ها/درایوها انتخاب کنید ، تمام داده های داخل آن را حذف می کند.
- پس از بازتولید مرحله 9 برای حذف تمام پارتیشن های درایو 0 ، فقط 0 فضای بدون محلول باید باقی بماند. انتخاب کنید [درایو 0 فضای غیرمجاز] ⑬ ، سپس کلیک کنید [بعد] ⑭ برای نصب مجدد ویندوز.
توجه: لطفاً اطمینان حاصل کنید که آداپتور AC در طی فرآیند به هم وصل شده است و برای جلوگیری از هرگونه مشکل ، مجبور به تعطیل نشوید.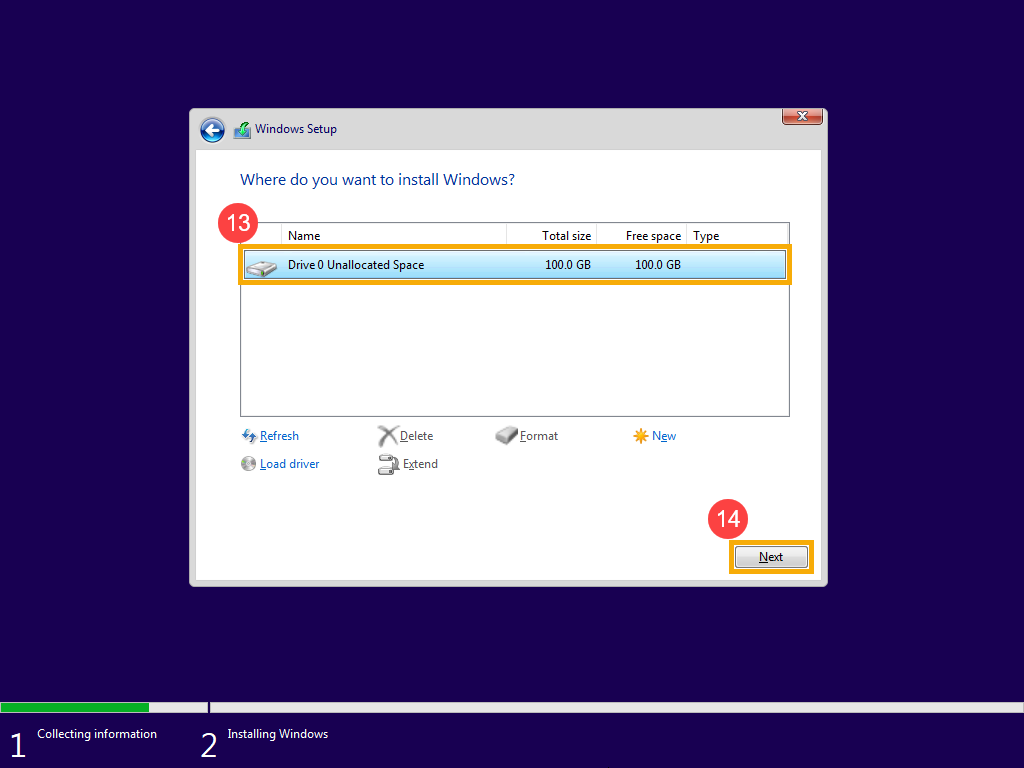
- رایانه پس از اتمام نصب مجدد ، صفحه تنظیم اصلی ویندوز را مجدداً راه اندازی و وارد می کند ، در اینجا می توانید در مورد ویندوز اطلاعات بیشتری کسب کنید – برای اولین بار شروع کنید.
- پس از تکمیل تنظیمات اصلی ویندوز و ورود به دسک تاپ ، برای بارگیری درایورها باید به سایت پشتیبانی ASUS بروید ، در اینجا می توانید در مورد نحوه جستجو و بارگیری درایورها اطلاعات بیشتری کسب کنید.
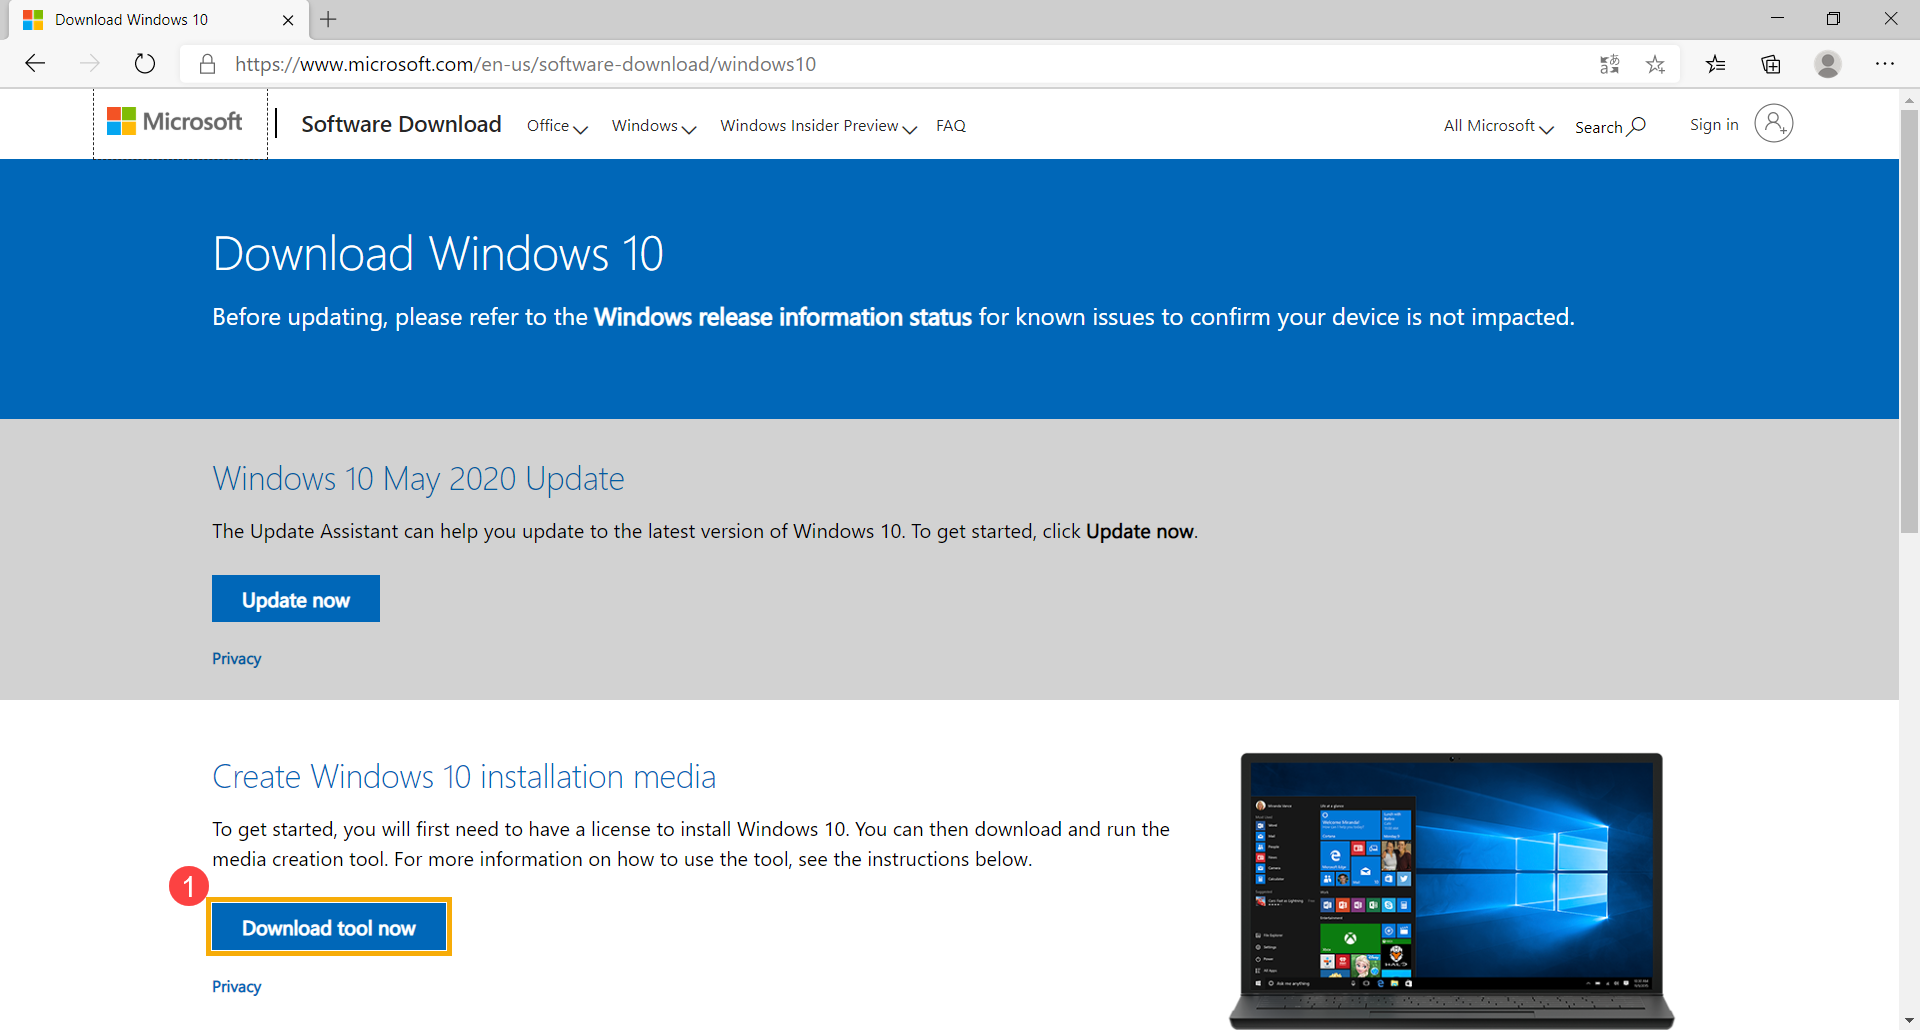
- به وب سایت مایکروسافت بروید ، کلیک کنید [اکنون ابزار بارگیری] ① برای بارگیری ابزار رسانه نصب ویندوز 10.

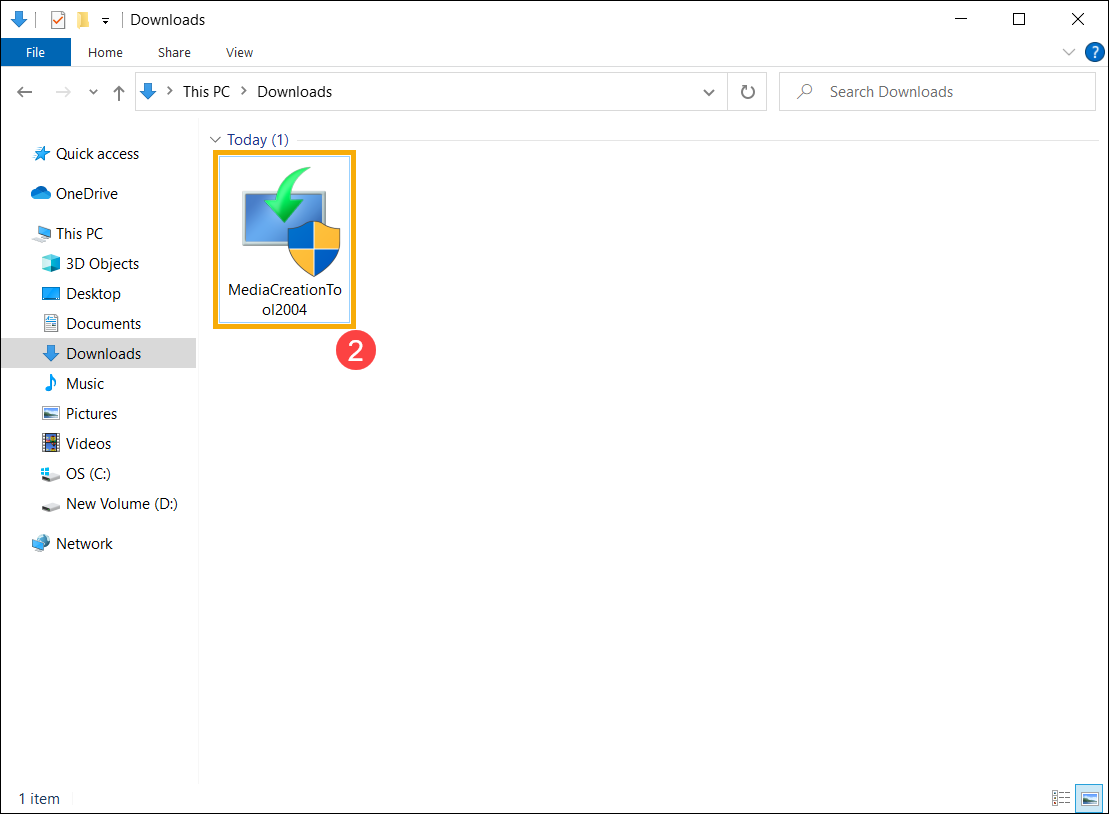
- به پوشه بارگیری شده از ابزار بروید ، سپس دوبار کلیک کنید [MediaCreationTool] ② پرونده برای شروع نصب.

- اگر کنترل حساب کاربری پنجره نمایش داده شده ، لطفا انتخاب کنید ③ .


- شرایط مجوز نرم افزار مایکروسافت و اعلامیه های قابل اجرا ، لطفا انتخاب کنید [تایید کنید] .

- انتخاب کنید ⑤ ، سپس انتخاب کنید [بعد] ⑥ .
- انتخاب کنید (64 بیتی یا 32 بیتی) که می خواهید برای رسانه نصب ویندوز 10 ایجاد کنید ، سپس انتخاب کنید [بعد] ⑧ .
توجه داشته باشید .
- [فلش درایو USB] ⑨ و سپس انتخاب کنید [بعد] ⑩ .
: تمام پرونده های موجود در درایو فلش USB در طی فرایند حذف می شوند , .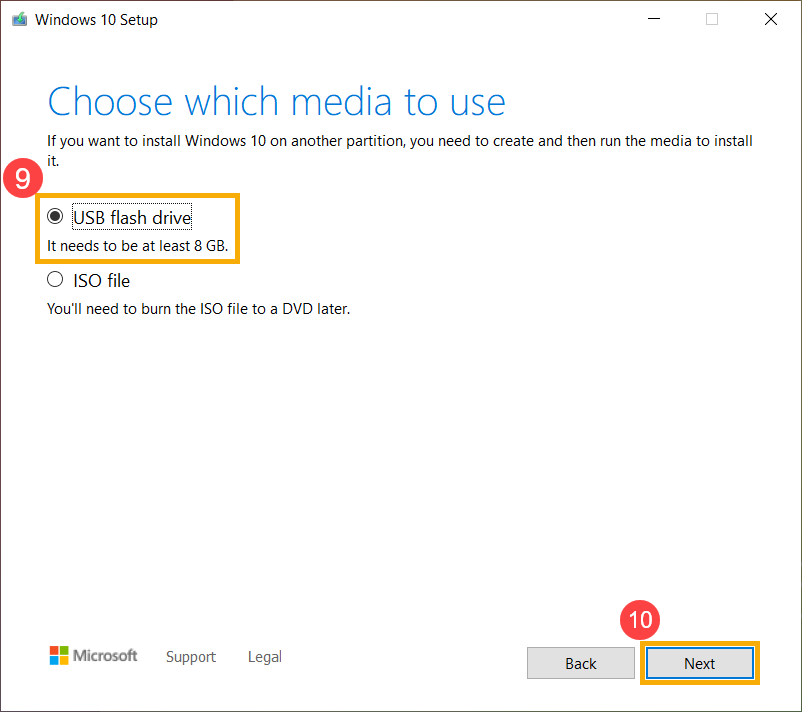
- در درایوهای قابل جابجایی ، درایو فلش USB را که می خواهید از آن استفاده کنید ، تأیید کرده و انتخاب کنید ، سپس انتخاب کنید . .
توجه: لطفاً اطمینان حاصل کنید که آداپتور AC در طول فرآیند اتصال اینترنتی پایدار وجود دارد و برای جلوگیری از ایجاد ، مجبور به تعطیل شدن نیست.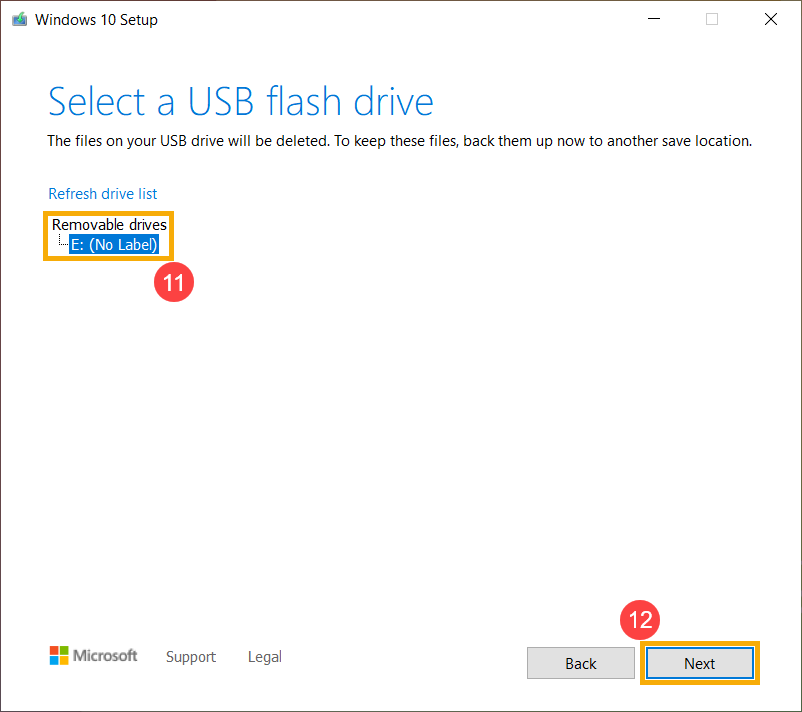
- رسانه نصب ایجاد شده است ، لطفاً کلیک کنید ⑬ .

- رسانه نصب (درایو فلش USB) را به رایانه خود وصل کنید.
- روی رایانه برق بگیرید و گزینه Boot را به عنوان USB Flash Drive انتخاب کنید ، در اینجا می توانید در مورد نحوه بوت شدن سیستم از USB Drive اطلاعات بیشتری کسب کنید.
- رایانه راه اندازی ویندوز را وارد می کند. [بعد] ② .
- کلیک [الآن نصب کن] ③ .
- اگر رایانه شما در سیستم عامل ویندوز ساخته شده است (که یک مجوز دیجیتالی است) ، لطفاً انتخاب کنید .
- لطفاً نسخه سیستم عامل را که می خواهید نصب کنید انتخاب کنید ، سپس کلیک کنید [بعد] .
: لطفا انتخاب کنید , در غیر این صورت ، اگر نسخه یکسان نباشد ، فعال سازی ویندوز خطا خواهد کرد.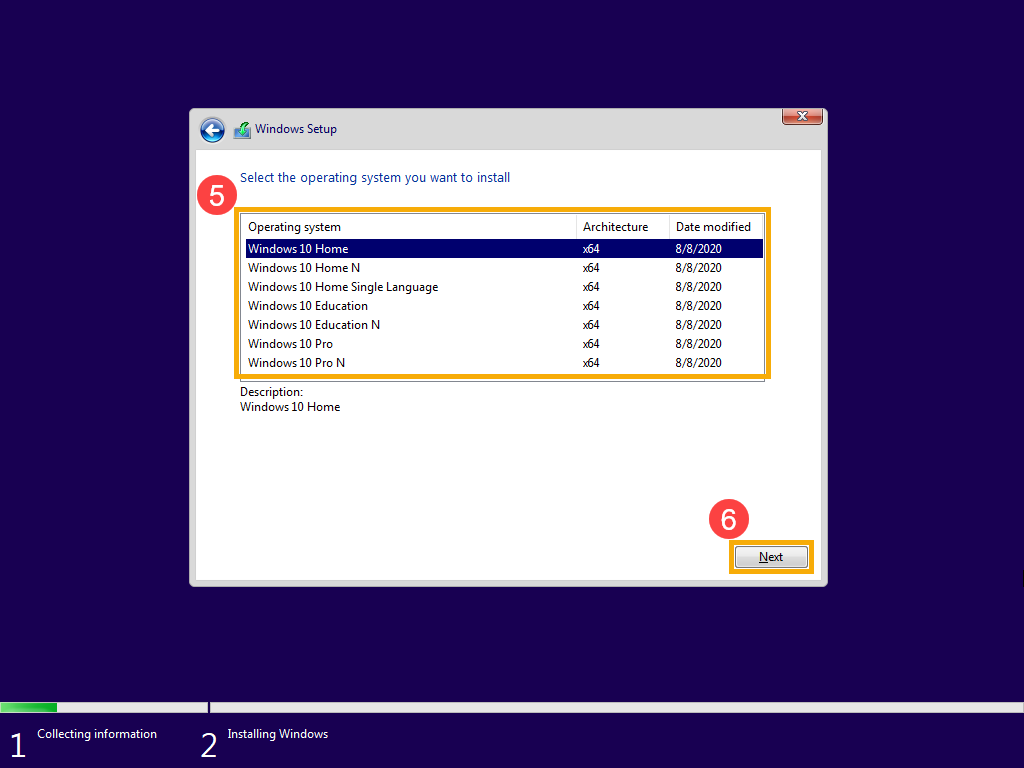
- شرایط مجوز نرم افزار مایکروسافت و اطلاعیه های قابل اجرا ، لطفاً کادر را بررسی کنید ⑦ ، سپس کلیک کنید [بعد] ⑧ .

- انتخاب کنید .
- لیست همه درایوها و پارتیشن ها را در رایانه خود مشاهده خواهید کرد. اگر چندین دیسک نمایش داده شود ، خواهید کرد فقط باید تمام پارتیشن ها را از دیسک جایی که می خواهید ویندوز نصب کنید حذف کنید. , بنابراین بیایید Drive 0 را به عنوان نمونه بگیریم.)
[حذف] ⑪ . اگر اعلان راه اندازی ویندوز ظاهر شد ، لطفاً انتخاب کنید [خوب] ⑫ .
توجه داشته باشید: اگر حذف را در سایر دیسک ها/درایوها انتخاب کنید ، تمام داده های داخل آن را حذف می کند. - پس از بازتولید مرحله 9 برای حذف تمام پارتیشن های درایو 0 ، فقط 0 فضای بدون محلول باید باقی بماند. [درایو 0 فضای غیرمجاز] ⑬ ، سپس کلیک کنید [بعد] ⑭ برای نصب مجدد ویندوز.
توجه: لطفاً اطمینان حاصل کنید که آداپتور AC در طی فرآیند به هم وصل شده است و برای جلوگیری از هرگونه مشکل ، مجبور به تعطیل نشوید. - رایانه پس از اتمام نصب مجدد ، صفحه تنظیم اصلی ویندوز را مجدداً راه اندازی و وارد می کند ، در اینجا می توانید در مورد ویندوز اطلاعات بیشتری کسب کنید – برای اولین بار شروع کنید.
- پس از تکمیل تنظیمات اصلی ویندوز و ورود به دسک تاپ ، برای بارگیری درایورها باید به سایت پشتیبانی ASUS بروید ، در اینجا می توانید در مورد نحوه جستجو و بارگیری درایورها اطلاعات بیشتری کسب کنید.
راه های نصب ویندوز 11
توجه داشته باشید: برای به روزرسانی در ویندوز 11 ، دستگاه ها باید حداقل سیستم ویندوز 11 را برآورده کنند. برخی از ویژگی های ویندوز 10 در ویندوز 11 موجود نیست. نیازهای سیستم برای تجربه برخی از ویژگی های ویندوز 11 و برنامه ها از حداقل سیستم ویندوز 11 استفاده می کنند. مشخصات ، ویژگی ها و نیازهای رایانه ویندوز 11 را پیدا کنید
قبل از اینکه شروع کنی
اطمینان حاصل کنید که دستگاهی که می خواهید ویندوز 11 را نصب کنید ، حداقل نیاز سیستم را برآورده می کند. اگر دستگاه شما در حال حاضر ویندوز 10 را اجرا می کند ، توصیه می کنیم حداقل نیاز سیستم را با استفاده از برنامه بررسی بهداشت PC تأیید کنید. . .
به روزرسانی ویندوز در تنظیمات (توصیه می شود)
. برای بررسی اینکه ویندوز 11 برای دستگاه شما آماده است ، انتخاب کنید شروع > تنظیمات > به روز رسانی و امنیت > به روز رسانی ویندوز به روزرسانی ها را بررسی کنید.
برای مشکلات شناخته شده ای که ممکن است بر دستگاه شما تأثیر بگذارد ، می توانید Hub Health Health Windows Release را نیز بررسی کنید.
. .
ایجاد رسانه نصب ویندوز 11
در صفحه بارگیری نرم افزار ویندوز 11 ، انتخاب کنید و دستورالعمل های نصب ویندوز 11 را دنبال کنید.
- . اگر تصمیم به نصب ویندوز 11 بر روی دستگاهی دارید که این شرایط را برآورده نمی کند ، و خطرات را تأیید و درک می کنید ، می توانید مقادیر کلید رجیستری زیر را ایجاد کرده و از چک برای TPM 2 دور بزنید.0 (حداقل TPM 1.2 مورد نیاز است) و خانواده و مدل CPU.
- کلید رجیستری: HKEY_LOCAL_MACHINE \ SYSTEM \ SETUP \ MOSETUP
- نام: AllowUpgradeSwithUnsupportedtpmorcpu
- نوع: reg_dword
- مقدار: 1
- توجه: اگر با استفاده از ویرایشگر رجیستری یا با استفاده از روش دیگری ، رجیستری را اصلاح کنید ، ممکن است مشکلات جدی رخ دهد. این مشکلات ممکن است نیاز داشته باشد که شما سیستم عامل را دوباره نصب کنید. مایکروسافت نمی تواند تضمین نماید که این مشکلات قابل حل است. رجیستری را در معرض خطر خود اصلاح کنید.
-
با راه اندازی تنظیمات در رسانه هنگام اجرای ویندوز 10 ، ارتقاء دهید. شما گزینه ای را خواهید داشت:
. انجام a , که پرونده های شخصی (از جمله درایور) ، برنامه ها و تنظیمات ویندوز را نگه می دارد. .
. پرونده های شخصی (از جمله درایور) را فقط نگه می دارد ، نه برنامه ها و نه تنظیمات ویندوز.
مهم: شما باید تأیید کنید که دستگاه شما قبل از انتخاب از رسانه ، حداقل نیاز سیستم را برآورده می کند ، زیرا به شما امکان می دهد در صورت داشتن حداقل TPM 1 ویندوز 11 را نصب کنید..0) ، و تأیید نمی کند که پردازنده شما بر اساس خانواده و مدل پردازنده در لیست CPU تأیید شده قرار دارد.
.
مهم: نصب تصویری از ویندوز 11 موارد زیر را بررسی نمی کند: TPM 2.0 (حداقل TPM 1.2 مورد نیاز است) و خانواده و مدل CPU.